Example Walkthrough
The CuBIDS workflow is currently being used in neuroimaging labs at a number of institutions
including University of Pennsylvania, Children’s Hospital of Philadelphia, the Child Mind Institute,
and University of Minnesota’s Masonic Institute for the Developing Brain.
To demonstrate the utility of CuBIDS,
here we apply the software to a small example dataset that is included
in our Github repo.
This example dataset does not contain any PHI.
Following the installation instructions at the installation page,
you should have successfully installed CuBIDS, DataLad, and the bids-validator inside a
conda environment titled “cubids”.
In this example, we use validator version 1.7.2.
Using a different version of the validator may result in slightly different validation tsv outputs,
but the example should still be useful.
Throughout this example, we use DataLad for version control.
Although DataLad is an optional dependency of CuBIDS,
we use it here to demonstrate its powerful integration with CuBIDS and the benefits
it can provide its users.
Now that we have installed CuBIDS and all necessary dependencies,
we are ready to begin the curation process on our example dataset.
We create a CuBIDS_Test directory to function as our working directory and navigate to it as follows.
$ mkdir $PWD/CuBIDS_Test
$ cd CuBIDS_Test
$ conda activate cubids
Now, download and unzip the example data (you can also do this in your Finder window):
$ curl -sSLO https://github.com/PennLINC/CuBIDS/raw/main/cubids/tests/data/BIDS_Dataset.zip
$ unzip BIDS_Dataset.zip
$ rm BIDS_Dataset.zip
Identifying and removing PHI
As a first step, we use CuBIDS to identify the metadata fields present in the dataset,
and remove any protected health information (PHI) or other sensitive fields.
We want to do this before implementing any DataLad commands,
as we must ensure PHI is not tracked as part of version control.
This is accomplished with the following command:
$ cubids print-metadata-fields BIDS_Dataset
This command returns a total of 66 fields, including acquisition parameters and other metadata fields present in the dataset’s JSON sidecars. From the output we can see that the dataset contains (simulated) PHI — the PatientName field, which we wish to remove. To remove the PatientName field from the sidecars, we can use the command:
$ cubids remove-metadata-fields BIDS_Dataset --fields PatientName
This command should succeed silently.
Checking the BIDS dataset into DataLad
Now that all PHI has been removed from the metadata, we are ready to check our dataset into datalad.
To do this, we run the following command:
$ datalad create -c text2git BIDS_Dataset_DataLad
This command creates a new directory called BIDS_Dataset_DataLad where
DataLad will begin implementing version control and provenance tracking while
we implement the rest of our CuBIDS workflow.
The creation of our datalad dataset is accordingly reflected in the dataset’s version control history,
accessible with git log.
At any point in the CuBIDS workflow,
we can view a summary of our dataset’s version history by running the following commands:
$ cd BIDS_Dataset_DataLad
$ git log --oneline
$ cd ..
This command will write the following to the terminal:

Next, we copy the contents of our BIDS dataset into the newly created and currently empty DataLad dataset and save the changes.
$ cd ..
$ cp -r BIDS_Dataset/* BIDS_Dataset_DataLad
In addition to being able to access the version history of our data, any point in this workflow, we can also check the status of untracked (not yet saved) changes using the datalad status command, as seen below:
$ cd BIDS_Dataset_DataLad && datalad status
$ cd ..
This command produces a description of the changes we have made to the data since the last commit (see below)
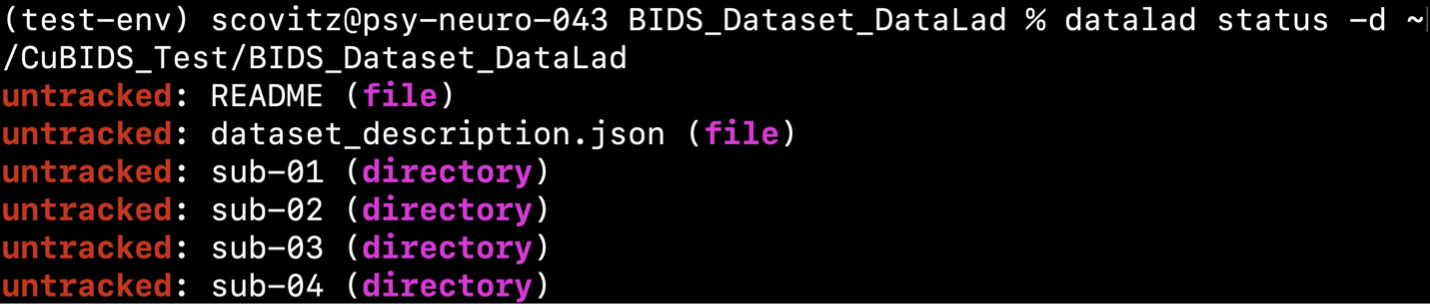
The command above shows all files untracked, as we have copied the BIDS data into
~/CuBIDS_Test/BIDS_Dataset_DataLad but have not yet saved those changes.
Our next step is to run save.
It is best practice to provide a detailed commit message, for example:
$ datalad save -d ~/CuBIDS_Test/BIDS_Dataset_DataLad -m "checked dataset into datalad"
At this stage, we also recommend removing the BIDS_Dataset directory — its contents are
safely copied into and tracked in BIDS_Dataset_DataLad.
We can check our git history to be sure,
which will display the version history of our dataset thus far,
with the following command:
$ cd BIDS_Dataset_DataLad/
$ git log --oneline
$ cd ..
which will produce the following:

As seen above, the creation of our DataLad dataset is now reflected in the dataset’s version control history. Note that it is best practice to provide a detailed commit message with each change made to the data.
Adding NIfTI Information to JSON Sidecars
Next, we seek to add more image parameters to our sidecars so that we can better define our Entity Sets. Historically, only a subset of parameters in the NIfTI image header have been included in a BIDS sidecar… Parameters such as image dimensions, number of volumes, image obliquity, and voxel sizes — all important data that can change how our pipelines will eventually run!
To add them to the sidecar metadata, run:
$ cubids add-nifti-info BIDS_Dataset_DataLad --use-datalad
This command adds the NIfTI header information to the JSON sidecars and saves those changes.
In order to ensure that this command has been executed properly,
we can run cubids print-metadata-fields once more,
which reveals that new NIfTI header information has been successfully included in the metadata.
Since we ran cubids add-nifti-info with the --use-datalad flag set,
CuBIDS automatically saves the changes made to the dataset to the git log as follows:

Note
For large datasets, you can speed up the metadata extraction process using the --n-cpus flag
to enable parallel processing. For example, to use 4 CPUs:
$ cubids add-nifti-info BIDS_Dataset_DataLad --use-datalad --n-cpus 4
This will also use parallel jobs for DataLad save operations when --use-datalad is set.
BIDS validation
$ cubids validate BIDS_Dataset_DataLad v0 --validation-scope subject
Note
The use of the --validation-scope subject flag forces the validator to treat each participant as its
own BIDS dataset.
This can be helpful for identifying heterogeneous elements,
or validating large datasets that would otherwise result in
“RangeError: Invalid string length” errors when the validator crashes
(producing empty STDOUT) because the JSON output is too large to serialize.
But --validation-scope subject can be slowed down by large datasets.
To speed up validation, you can use the --n-cpus flag to enable parallel processing.
For example, to validate using 4 CPUs:
$ cubids validate BIDS_Dataset_DataLad v0 --validation-scope subject --n-cpus 4
Warning
For internetless use cases, please see dedicated section of the Installation page on how to download a local version of the validator.
After that, you will need to add --local-validator option to the command string above.
The next step in the CuBIDS workflow is to run BIDS validation
to detect potential curation errors using cubids validate.
This command produces the following tsv:
files |
type |
severity |
description |
code |
url |
subject |
|---|---|---|---|---|---|---|
/sub-02/ses-phdiff/func/sub-02_ses-phdiff_task-rest_bold.nii.gz |
PHASE_ENCODING_DIRECTION_NOT_DEFINED |
warning |
You should define ‘PhaseEncodingDirection’ for this file. If you don’t provide this information field map correction will not be possible. |
7 |
https://neurostars.org/search?q=PHASE_ENCODING_DIRECTION_NOT_DEFINED |
sub-02 |
/sub-03/ses-phdiff/dwi/sub-03_ses-phdiff_acq-HASC55AP_dwi.nii.gz |
TOTAL_READOUT_TIME_NOT_DEFINED |
warning |
You should define ‘TotalReadoutTime’ for this file. If you don’t provide this information field map correction using TOPUP might not be possible. |
9 |
https://neurostars.org/search?q=TOTAL_READOUT_TIME_NOT_DEFINED |
sub-03 |
This initial validation run reveals firstly that Phase Encoding Direction (PED) is not specified
for one of the task-rest BOLD scans.
This is an important parameter for
fieldmap correction in fMRIPRep,
so knowing this ahead of time is valuable information.
To resolve this,
we could either find the PED for this scan elsewhere and edit its sidecar to include it,
or remove that scan from the dataset.
For the purposes of this demonstration,
we elect to remove the scan.
To do this, we run the cubids purge command.
cubids purge requires as input a list of files to cleanly “purge” from the dataset.
You can create this file in any text editor,
as long as it is saved as plain text .txt.
When specifying files in this text file,
always use relative paths starting from your BIDS directory.
For this example, we created the following file:
$ cat no_ped.txt

sub-02/ses-phdiff/func/sub-02_ses-phdiff_task-rest_bold.nii.gz
and saved it in our CuBIDS_Test directory.
To safely purge this file from the dataset, run:
$ cubids purge BIDS_Dataset_DataLad no_ped.txt --use-datalad
We elect to use cubids purge instead of simply removing the scan due to the fact that
purge will ensure all associations,
such as sidecars and IntendedFor references in fieldmaps,
are also safely deleted.
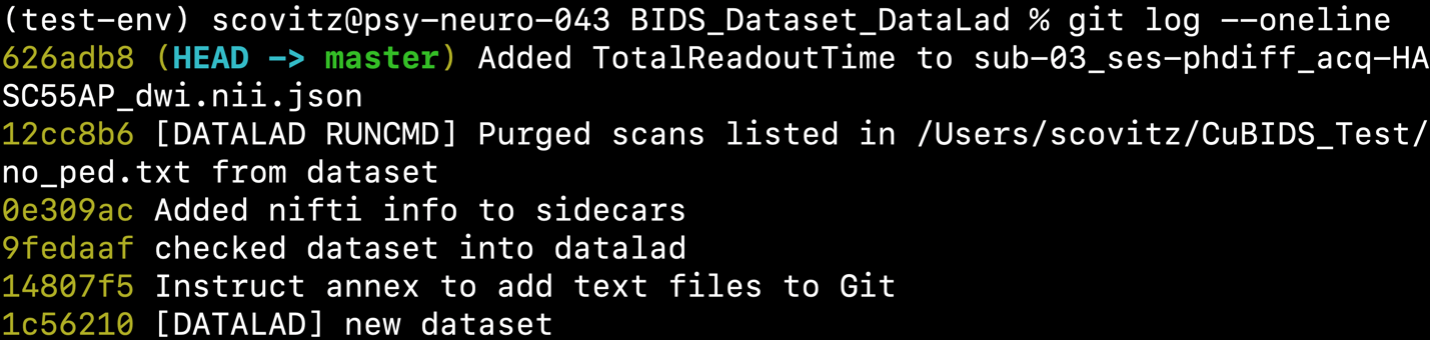
CuBIDS will reflect these deletions in the git history:

Returning again to v0_validation.tsv,
we can also see that there is one DWI scan missing TotalReadoutTime,
a metadata field necessary for fieldmap correction.
After conferring with our MR physicist and the scanner technician,
we determine that TotalReadoutTime (TRT) was erroneously omitted from the DWI sidecars!
After some digging, the technician provided us with the correct value,
so it’s now our job to manually add it to the sidecar for which it is missing.
Once we have this value, we manually add it to the sidecar for which it is missing by opening
BIDS_Dataset_DataLad/sub-03/ses-phdiff/dwi/sub-03_ses-phdiff_acq-HASC55AP_dwi.json
in an editor and adding the following line:
"TotalReadoutTime": 0.0717598,
on a new line anywhere inside the curly braces between lines containing parameters and their values, save the changes, and close the JSON file. We then save the latest changes to the dataset with a detailed commit message as follows:
$ datalad save -d BIDS_Dataset_DataLad -m "Added TotalReadoutTime to sub-03_ses-phdiff_acq-HASC55AP_dwi.nii.json"
This change will be reflected in the git history.
To verify that there are no remaining validation errors, we rerun validation with the following command:
$ cubids validate BIDS_Dataset_DataLad v1 --validation-scope subject
This command should produce no tsv output, and instead print “No issues/warnings parsed, your dataset is BIDS valid” to the terminal, which indicates that the dataset is now free from BIDS validation errors and warnings.
Visualizing metadata heterogeneity
Next, we’ll use CuBIDS to gain some insight on the dataset’s structure, heterogeneity,
and metadata errors.
We’ll do this with cubids group.
Large datasets almost inevitably contain multiple validation and metadata errors,
so it’s useful to run both cubids validate and cubids group in parallel,
as validation errors are better understood within the context of a dataset’s heterogeneity.
Being able to see both metadata errors
(such as missing or incorrectly specified sidecar parameters)
that grouping reveals alongside BIDS errors that the validator catches,
gives users a more comprehensive view of the issues they will need to fix during the curation process.
Note that if users choose to provide just a pass in just a filename prefix (e.g. V1)
for the second argument,
then CuBIDS will put the four grouping outputs in bids_dir/code/CuBIDS.
If users provide a path (e.g., /Users/scovitz/BIDS/V1),
then output files will go to the specified location.
An example command for running the grouping function as follows:
$ cubids group BIDS_Dataset_DataLad v0
You can also specify one or more entities to ignore when creating entity sets using the
--ignore-entity flag. For example, to ignore task entity:
$ cubids group BIDS_Dataset_DataLad v0 --ignore-entity task
This command will produce four tables that describe the dataset’s heterogeneity in different ways.
v0_summary.tsvcontains all detected Key and Parameter groups and provides a high-level overview of the heterogeneity in the entire dataset.v0_files.tsvmaps each imaging file in the BIDS directory to a Key and Parameter group.v0_AcqGrouping.tsvmaps each session in the dataset to an Acquisition Group.v0_AcqGroupInfo.txtlists the set of scanning parameters present in each Acquisition Group.
By first examining v0_summary.tsv users are given the opportunity to conduct metadata
quality assurance (QA).
The file can help identify instances of incomplete, incorrect, or unusable parameter groups,
based on acquisition fields such as dimension and voxel sizes, number of volumes, obliquity, and more.
Warning
You may see some non-BIDS entities in the entity sets;
for example, fmap-<suffix> is generally present for fieldmaps,
even though fmap is not a BIDS entity.
This is because PyBIDS includes some custom entities that are not part of the BIDS specification.
Don’t worry about these. The step that generates filenames from the entity sets should ignore them automatically.
While v0_validation.tsv identified all the BIDS validation errors present in the dataset,
it did not identify any potential issues that might be present within the sidecars’ metadata.
Below, we see instances of missing metadata fields in a handful of sidecars,
which may impact successful execution of BIDS Apps.
Notes |
ManualCheck |
MergeInto |
RenameEntitySet |
KeyParamGroup |
EntitySet |
ParamGroup |
Counts |
Dim1Size |
Dim2Size |
Dim3Size |
EchoTime |
EffectiveEchoSpacing |
FlipAngle |
HasFieldmap |
EntitySetCount |
Modality |
NSliceTimes |
NumVolumes |
Obliquity |
PartialFourier |
PhaseEncodingDirection |
RepetitionTime |
TotalReadoutTime |
UsedAsFieldmap |
VoxelSizeDim1 |
VoxelSizeDim2 |
VoxelSizeDim3 |
|---|---|---|---|---|---|---|---|---|---|---|---|---|---|---|---|---|---|---|---|---|---|---|---|---|---|---|---|
datatype-anat_suffix-T1w__1 |
datatype-anat_suffix-T1w |
1 |
4 |
180 |
216 |
180 |
0.0029 |
8 |
False |
4 |
anat |
0 |
1.0 |
False |
i- |
2.5 |
False |
1.0 |
1.0 |
1.0 |
|||||||
datatype-dwi_suffix-dwi_acquisition-HASC55AP__1 |
datatype-dwi_suffix-dwi_acquisition-HASC55AP |
1 |
2 |
36 |
43 |
36 |
0.089 |
0.00069 |
90 |
True |
4 |
dwi |
36 |
61.0 |
False |
j |
4.2 |
0.072 |
False |
5.0 |
5.0 |
5.0 |
|||||
datatype-dwi_suffix-dwi_acquisition-HASC55APVARIANTNumVolumes10 |
datatype-dwi_suffix-dwi_acquisition-HASC55AP__2 |
datatype-dwi_suffix-dwi_acquisition-HASC55AP |
2 |
1 |
36 |
43 |
36 |
0.089 |
0.00069 |
90 |
True |
4 |
dwi |
36 |
10.0 |
False |
j |
4.2 |
0.072 |
False |
5.0 |
5.0 |
5.0 |
||||
datatype-dwi_suffix-dwi_acquisition-HASC55APVARIANTEchoTime2 |
datatype-dwi_suffix-dwi_acquisition-HASC55AP__3 |
datatype-dwi_suffix-dwi_acquisition-HASC55AP |
3 |
1 |
36 |
43 |
36 |
0.07 |
0.00069 |
90 |
True |
4 |
dwi |
36 |
61.0 |
False |
j |
4.2 |
0.072 |
False |
5.0 |
5.0 |
5.0 |
||||
datatype-fmap_fmap-magnitude1_suffix-magnitude1_acquisition-v4__1 |
datatype-fmap_fmap-magnitude1_suffix-magnitude1_acquisition-v4 |
1 |
4 |
36 |
43 |
36 |
0.004 |
60 |
False |
4 |
fmap |
0 |
1.0 |
False |
0.75 |
j- |
1.5 |
False |
5.0 |
5.0 |
5.0 |
||||||
datatype-fmap_fmap-magnitude2_suffix-magnitude2_acquisition-v4__1 |
datatype-fmap_fmap-magnitude2_suffix-magnitude2_acquisition-v4 |
1 |
4 |
36 |
43 |
36 |
0.006 |
60 |
False |
4 |
fmap |
0 |
1.0 |
False |
0.75 |
j- |
1.5 |
False |
5.0 |
5.0 |
5.0 |
||||||
datatype-fmap_fmap-phasediff_suffix-phasediff_acquisition-v4__1 |
datatype-fmap_fmap-phasediff_suffix-phasediff_acquisition-v4 |
1 |
4 |
36 |
43 |
36 |
60 |
False |
4 |
fmap |
0 |
1.0 |
False |
0.75 |
j- |
1.5 |
True |
5.0 |
5.0 |
5.0 |
|||||||
datatype-fmap_direction-PA_fmap-epi_suffix-epi__1 |
datatype-fmap_direction-PA_fmap-epi_suffix-epi |
1 |
3 |
36 |
43 |
36 |
0.089 |
0.00069 |
90 |
False |
4 |
fmap |
36 |
1.0 |
False |
j- |
4.2 |
0.072 |
True |
5.0 |
5.0 |
5.0 |
|||||
datatype-fmap_direction-PA_fmap-epi_suffix-epi_acquisition-VARIANTUnused |
datatype-fmap_direction-PA_fmap-epi_suffix-epi__2 |
datatype-fmap_direction-PA_fmap-epi_suffix-epi |
2 |
1 |
36 |
43 |
36 |
0.089 |
0.00069 |
90 |
False |
4 |
fmap |
36 |
1.0 |
False |
j- |
4.2 |
0.072 |
False |
5.0 |
5.0 |
5.0 |
||||
datatype-func_suffix-bold_task-rest__1 |
datatype-func_suffix-bold_task-rest |
1 |
2 |
36 |
43 |
36 |
0.089 |
0.00069 |
70 |
True |
3 |
func |
36 |
61.0 |
False |
j |
1.0 |
0.072 |
False |
5.0 |
5.0 |
5.0 |
|||||
datatype-func_suffix-bold_task-rest_acquisition-VARIANTFlipAngle90 |
datatype-func_suffix-bold_task-rest__2 |
datatype-func_suffix-bold_task-rest |
2 |
1 |
36 |
43 |
36 |
0.089 |
0.00069 |
90 |
True |
3 |
func |
36 |
61.0 |
False |
j |
1.0 |
0.072 |
False |
5.0 |
5.0 |
5.0 |
Examining v0_summary.tsv we can see that one DWI Parameter Group —
datatype-dwi_suffix-dwi_acquisition-HASC55AP__2 —
contains only one scan (see “Counts” column) with only 10 volumes
(see “NumVolumes” column).
Since the majority of DWI scans in this dataset have 61 volumes,
CuBIDS assigns this single scan to a “Variant” (i.e. non-dominant) Parameter Group,
and automatically populates that Parameter Group’s “RenameEntitySet” column in v0_summary.tsv
with a suggested name.
Note
CuBIDS now uses a more explicit variant naming format. In this case, since NumVolumes is a regular
(non-clustered) parameter, the actual value is included in the variant name:
datatype-dwi_suffix-dwi_acquisition-HASC55APVARIANTNumVolumes10.
This time, though,
we elect to remove this scan because it does not have enough volumes to be usable for most analyses.
To do this, we can either use cubids purge again,
or we could edit v0_summary.tsv by adding 0 to the MergeInto column in the row
(Parameter Group) we want to remove.
This will ensure all scans in that Parameter Group (in this example, just one scan) are removed.
Make this change and save this edited version of v0_summary.tsv as v0_edited_summary.tsv,
which will be passed to cubids apply in our next curation step.
Notes |
ManualCheck |
MergeInto |
RenameEntitySet |
KeyParamGroup |
EntitySet |
ParamGroup |
Counts |
Dim1Size |
Dim2Size |
Dim3Size |
EchoTime |
EffectiveEchoSpacing |
FlipAngle |
HasFieldmap |
EntitySetCount |
Modality |
NSliceTimes |
NumVolumes |
Obliquity |
PartialFourier |
PhaseEncodingDirection |
RepetitionTime |
TotalReadoutTime |
UsedAsFieldmap |
VoxelSizeDim1 |
VoxelSizeDim2 |
VoxelSizeDim3 |
|---|---|---|---|---|---|---|---|---|---|---|---|---|---|---|---|---|---|---|---|---|---|---|---|---|---|---|---|
datatype-anat_suffix-T1w__1 |
datatype-anat_suffix-T1w |
1 |
4 |
180 |
216 |
180 |
0.0029 |
8 |
FALSE |
4 |
anat |
0 |
1.0 |
FALSE |
i- |
2.5 |
FALSE |
1.0 |
1.0 |
1.0 |
|||||||
datatype-dwi_suffix-dwi_acquisition-HASC55AP__1 |
datatype-dwi_suffix-dwi_acquisition-HASC55AP |
1 |
2 |
36 |
43 |
36 |
0.089 |
0.00069 |
90 |
TRUE |
4 |
dwi |
36 |
61.0 |
FALSE |
j |
4.2 |
0.072 |
FALSE |
5.0 |
5.0 |
5.0 |
|||||
0 |
datatype-dwi_suffix-dwi_acquisition-HASC55APVARIANTNumVolumes10 |
datatype-dwi_suffix-dwi_acquisition-HASC55AP__2 |
datatype-dwi_suffix-dwi_acquisition-HASC55AP |
2 |
1 |
36 |
43 |
36 |
0.089 |
0.00069 |
90 |
TRUE |
4 |
dwi |
36 |
10.0 |
FALSE |
j |
4.2 |
0.072 |
FALSE |
5.0 |
5.0 |
5.0 |
|||
datatype-dwi_suffix-dwi_acquisition-HASC55APVARIANTEchoTime2 |
datatype-dwi_suffix-dwi_acquisition-HASC55AP__3 |
datatype-dwi_suffix-dwi_acquisition-HASC55AP |
3 |
1 |
36 |
43 |
36 |
0.07 |
0.00069 |
90 |
TRUE |
4 |
dwi |
36 |
61.0 |
FALSE |
j |
4.2 |
0.072 |
FALSE |
5.0 |
5.0 |
5.0 |
||||
datatype-fmap_fmap-magnitude1_suffix-magnitude1_acquisition-v4__1 |
datatype-fmap_fmap-magnitude1_suffix-magnitude1_acquisition-v4 |
1 |
4 |
36 |
43 |
36 |
0.004 |
60 |
FALSE |
4 |
fmap |
0 |
1.0 |
FALSE |
0.75 |
j- |
1.5 |
FALSE |
5.0 |
5.0 |
5.0 |
||||||
datatype-fmap_fmap-magnitude2_suffix-magnitude2_acquisition-v4__1 |
datatype-fmap_fmap-magnitude2_suffix-magnitude2_acquisition-v4 |
1 |
4 |
36 |
43 |
36 |
0.006 |
60 |
FALSE |
4 |
fmap |
0 |
1.0 |
FALSE |
0.75 |
j- |
1.5 |
FALSE |
5.0 |
5.0 |
5.0 |
||||||
datatype-fmap_fmap-phasediff_suffix-phasediff_acquisition-v4__1 |
datatype-fmap_fmap-phasediff_suffix-phasediff_acquisition-v4 |
1 |
4 |
36 |
43 |
36 |
60 |
FALSE |
4 |
fmap |
0 |
1.0 |
FALSE |
0.75 |
j- |
1.5 |
TRUE |
5.0 |
5.0 |
5.0 |
|||||||
datatype-fmap_direction-PA_fmap-epi_suffix-epi__1 |
datatype-fmap_direction-PA_fmap-epi_suffix-epi |
1 |
3 |
36 |
43 |
36 |
0.089 |
0.00069 |
90 |
FALSE |
4 |
fmap |
36 |
1.0 |
FALSE |
j- |
4.2 |
0.072 |
TRUE |
5.0 |
5.0 |
5.0 |
|||||
datatype-fmap_direction-PA_fmap-epi_suffix-epi_acquisition-VARIANTUnused |
datatype-fmap_direction-PA_fmap-epi_suffix-epi__2 |
datatype-fmap_direction-PA_fmap-epi_suffix-epi |
2 |
1 |
36 |
43 |
36 |
0.089 |
0.00069 |
90 |
FALSE |
4 |
fmap |
36 |
1.0 |
FALSE |
j- |
4.2 |
0.072 |
FALSE |
5.0 |
5.0 |
5.0 |
||||
datatype-func_suffix-bold_task-rest__1 |
datatype-func_suffix-bold_task-rest |
1 |
2 |
36 |
43 |
36 |
0.089 |
0.00069 |
70 |
TRUE |
3 |
func |
36 |
61.0 |
FALSE |
j |
1.0 |
0.072 |
FALSE |
5.0 |
5.0 |
5.0 |
|||||
datatype-func_suffix-bold_task-rest_acquisition-VARIANTFlipAngle90 |
datatype-func_suffix-bold_task-rest__2 |
datatype-func_suffix-bold_task-rest |
2 |
1 |
36 |
43 |
36 |
0.089 |
0.00069 |
90 |
TRUE |
3 |
func |
36 |
61.0 |
FALSE |
j |
1.0 |
0.072 |
FALSE |
5.0 |
5.0 |
5.0 |
Applying changes
Now that all metadata issues have been addressed —
both validation and CuBIDS summary —
we are ready to rename our files based on their RenameEntitySet values and
apply the requested deletion in v0_edited_summary.tsv.
The cubids apply function renames scans in each Variant Parameter Group according
to the metadata parameters that differ from the dominant group. The variant name follows
the format acquisition-VARIANT{parameter}{value}_, where:
- VARIANT indicates a deviation from the dominant group
- {parameter} is the name of the differing parameter
- {value} is either the cluster number (for clustered parameters) or actual value
This naming scheme allows users to easily see which parameters vary from the dominant group
in each scan’s filename.
If the edited summary and files tsvs are located in the bids_dir/code/CuBIDS directory,
the user may just pass in those filenames.
Otherwise, specifying the path to those files is necessary.
We can execute cubids apply with the following command:
$ cubids apply BIDS_Dataset_DataLad v0_edited_summary.tsv v0_files.tsv v1 --use-datalad
Note
For large datasets, you can speed up DataLad operations by using the --n-cpus flag
to enable parallel jobs for datalad save and datalad run operations. For example, to use 4 CPUs:
$ cubids apply BIDS_Dataset_DataLad v0_edited_summary.tsv v0_files.tsv v1 --use-datalad --n-cpus 4
Checking our git log, we can see that our changes from apply have been saved.
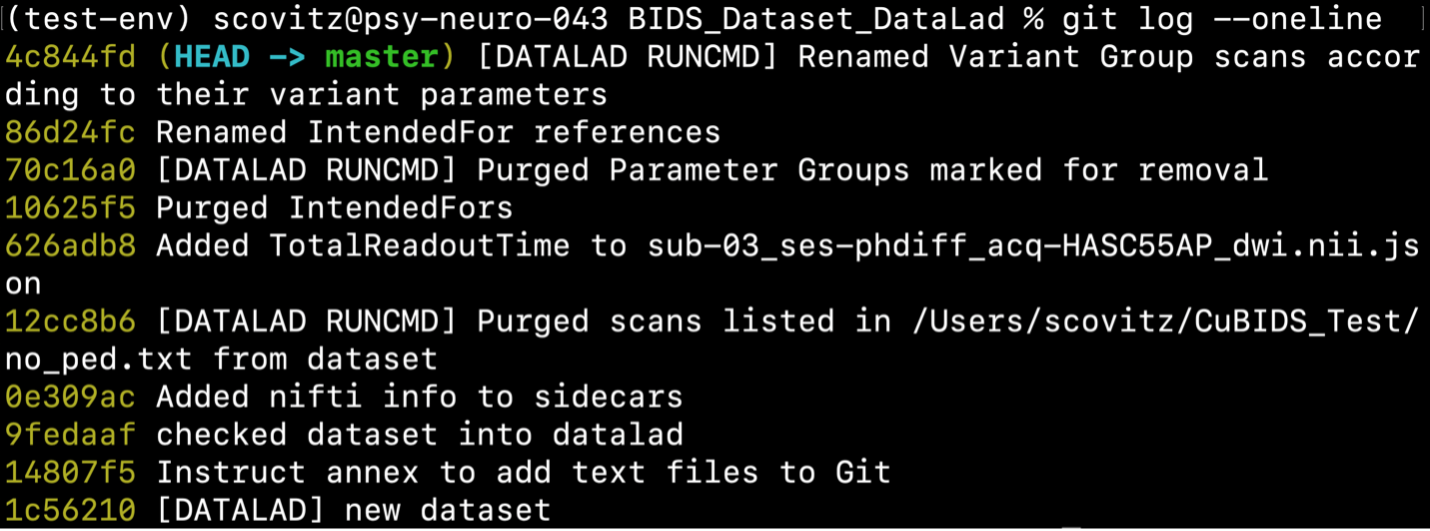
We can check the four grouping tsvs cubids apply produces (v1_*) to ensure they look as expected —
that all files with variant scanning parameters have been renamed with the correct format
(e.g., VARIANTEchoTime2 for clustered parameters, VARIANTFlipAngle75 for regular parameters)
in their acquisition fields.
Exemplar testing
The curation of the dataset is complete; finally,
it’s time for pre-processing.
To streamline this step, and as an added measure for reproducibility and quality assurance,
CuBIDS facilitates this subsequent step through the creation of an Exemplar Dataset:
a subset of the full dataset that spans the full variation of acquisitions and
parameters by including one subject from each Acquisition Group.
By testing only one subject per Acquisition Group,
users are able to pinpoint specific metadata values and scans that may trigger pipeline failures.
These acquisition groups could then be evaluated in more detail and flagged for remediation or exclusion.
The Exemplar Dataset can easily be created with the cubids copy-exemplars command,
to which we pass in v2_AcqGrouping.tsv as input
(the post cubids apply acquisition grouping tsv).
$ cubids copy-exemplars BIDS_Dataset_DataLad Exemplar_Dataset v1_AcqGrouping.tsv --use-datalad
Since we used the use-datalad flag,
Exemplar_Dataset is a DataLad dataset with the version history tracked in its git log (see below):

Once a preprocessing pipeline completes successfully on the Exemplar Dataset, the full dataset can be executed with confidence, as a pipeline’s behavior on the full range of metadata heterogeneity in the dataset will have already been discovered during exemplar testing.